In this Photoshop Tutorial Easy-Psd will show you how to create abstract ice blocks background . For the start we need a big rectangular document ( I used like 1200x1200). We need this big because in the end we will use just 1/4 of the original size. Press "D" to put the foreground color to black and the background color to white. Now just apply Filter-Render-Clouds.
 The image got some very dark areas so we will modify the levels . Press Ctrl+L and apply the settings like in the image below:
 Now will come the nice part. With just a few clicks we will obtain an amazing effect. Go to Filter-Stylize-Extrude and select "Blocks" with 40 pixel size and 40 Depth. You will get something like this:
 For the Ice Blocks to look more real we need to change the color. For this we will press Ctrl+U and we will play around with the options until we get a light blue color.
 Now hit Ctrl+F to apply the last filter again and you will get an abstract ice block image. I think the image look good but for a better visual effect I decided to cut of a half of the image because of the extrude filter. After cutting out 1/4 of the image i got something like this:
 If you like this tutorial please share it with your friends by clicking on the links below.For any questions just post here a comment.
10 dec. 2010
3D Ice Blocks Photoshop Tutorial
24 nov. 2010
Speed Fire Car
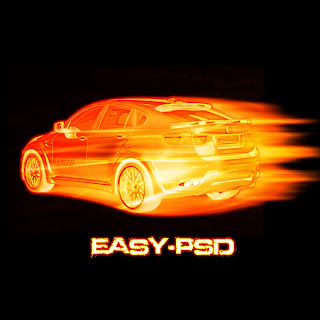
In this tutorial Easy-Psd will show you how to create a speed fire car with Adobe Photoshop.
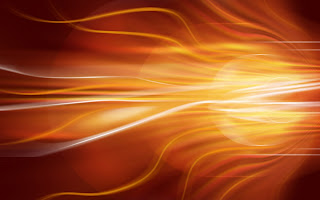
 For this tutorial we need a picture with a car , but the background of the image must be white. Another think we need is a fire background picture.I found this background on google:
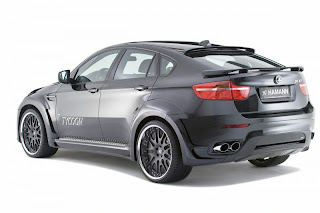
 Now find the image with the car. Don't forget about the white Background . I decided to use this picture because I love BMW :)
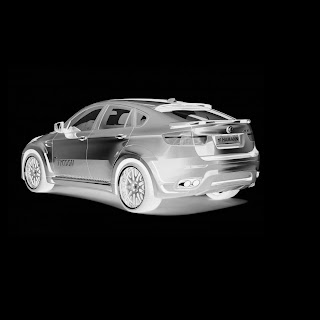
 For this tutorial we will use maybe an unusual thing. Open the image with the car , select the whole layer (Ctrl+A) and go to Edit-Define Brush Present and define the whole layer as a brush.
 Create a new layer(Shift+Ctrl+N) and on this layer apply the fire background (Open the fire background document , press Ctrl+A , Ctrl+C and on the car document , on the new layer press Ctrl+V .Put the layer mod to Overlay . You should obtain something like this:
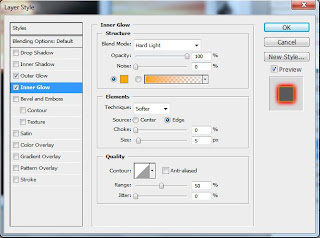
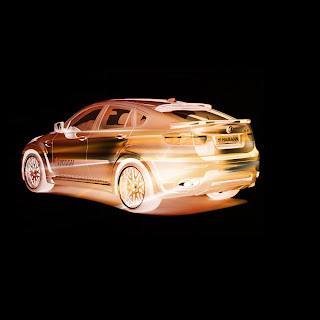 Now right click on the layer where you applied the brush and go to Blending Options and apply the following settings:
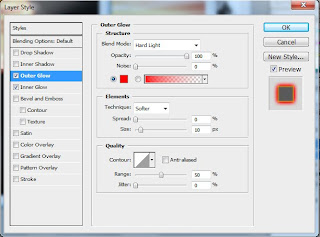 For the Outer Glow the color is #ff0000.
For the Inner Glow the color is #ffa800.
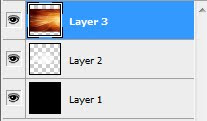
 I think that the image already look very nice but we can still improve it.Go on the layer with the brush and duplicate it ( Layer-Duplicate Layer). Now your layer pallet should look like this:
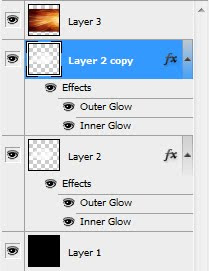 Now on the "Layer 2" we will add some filters. Go to Filter-Stylize-Wind From the Left and add this filter.To repeat the filter , hit 2 or 3 times Ctrl+F. Another filter will be Filter-Blur-Motion Blur and apply it with a 90 Angle and a Distance of 10 pixels.You should obtain something like this:
 Now the image is ready. You can also add some text with the same Blending Options like the one used for the car .If you like this tutorial please share it with your friends by clicking on the links below.For any questions just post here a comment.
15 nov. 2010
Glowing Heart
In this Photoshop Tutorial , Easy-Psd will teach you how to create a glowing shape based on a primary shape . First of all create a new big size image with black background. In the left menu click on Custom Shape Tool(U) and draw a shape you want to make , but don't make the shape too big because it will be hard to handle . I selected a heart.
Now that you made your shape , go to Pen Tool (P) , right click on the shape and click Make Selection . Now that the area are selected fill in with a color. Now create a new layer (Shift+Ctrl+N) , and install this brush pack. Now with one of the new brushes and with white color draw a brush with the size bigger then the shape you selected.
 Now you have to make the brush take the shape you want . For this heart is enough to make half of it because it's symmetrical . Press Ctrl+T for transform and Right Click on it to rotate it in the position you want .
 Now make it look better and take the shape you want . For this , press Ctrl+T , right click on it and click on Warp. Play around with the image until you get something like this :
For a better accuracy , you have to warp it more then once. After the second warp and the image look like this: The image still don't look like i want so i will warp it again (Ctrl+T then right click and select warp).
 Now the hard part is over . Hide the layer with the background and select the new layers content ( Ctrl+A ) and copy the selected area ( Ctrl+C). Then create a new file (Ctrl+N) then paste (Ctrl+V) . On the top menu , go to Image-Rotate Canvas-Flip Canvaz Horizontal. Select the resulting image ( Ctrl+A) , then copy it (Ctrl+C) and paste it on your first document.Make the background visible again and move the pasted area like in the image below.
Now you can make your background image black because you don't need the original shape now . Hide the brushed layers and on the background image fill everything black(Alt+Backspace). Now make the layers visible again and select the layer 3 and merge it down (Ctrl+E) . Now your image should look like this:
 The image is already done now you just have to add some color. Create a new layer ( Shift+Ctrl+N) and brush some color around the shape then set the layer mode to Overlay.

 The image is ready. If you like this tutorial please share it with your friends by clicking on the links below.For any questions just post here a comment.
12 nov. 2010
Car Window Tint
In this simple Photoshop tutorial i will teach you how to make your car look better by tinting it's window. For this tutorial we need a picture with a car. I will use the car from this tutorial. Ok now we need to select the area we want to tint. For this , we will use the Pen Tool(P) or the magnetic Lasoo Tool(L) . Create a new layer (Shift+Ctrl+N) and select the areas you want to tint. Now dry the selected party in black.
Now it's easy. Set the layer mode to "Overlay" , then duplicate the layer (Layer-Duplicate Layer) and for the duplicated layer set the opacity to 70%.
The image is ready. If you like this tutorial please share it with your friends by clicking on the links below.For any questions just post here a comment.
27 aug. 2010
Color Change
In this simple tutorial I will show you how to modify the colors in a picture . First we need a picture . For this tutorial I choose a picture with a dress . Open the picture with Adobe Photoshop . OK now we got the picture . I will change the color of the dress . We need to select the area with the color we want to change . For this we will use the Pen Tool(P). Just select the area like in the picture below:
 After you finish with the Pen Tool right click inside the area and click on Make Selection . Your image should look like this:
 Now we are almost ready . Hit Ctrl+U , click on colorize and play around with the Hue , Saturation and Lightness . I used those settings:
 Now the color change is finished:D I hope this tutorial will help you . If you have any question just post it here.
23 aug. 2010
Photoshop Tattoo
In this tutorial I will show you how to add tattoos on your skin in some easy steps with Adobe Photoshop . First we need a tattoo design and a picture with some exposed skin. I will use this two pictures ( i found the pictures on google) :
 Now I will work a little bit with the tattoo design . I will cut out the logo and i will pick up just the black color. For this i will delete the logo using the Eraser Tool and then from Select-Color Range I will pick up just the black area of the picture. Then go to Select-Invert and press delete . Now my tattoo design look like this:
 Now we have to add the tattoo . First open the image on witch you want to add the tattoo but let the tattoo design image opened. Now go to the tattoo design , copy it and paste it on the other picture . You should have something like this:
 The tattoo doesn't fit with the image so we will adjust it . Press ctrl+T and from Scale make it the right size and from Rotate adjust his position . After scale and rotate adjustments my image look like this:
 Now the image is almost ready. Put the layer mode on Multiply and the Opacity to 70% .
 Now your image is ready:D . If you have any questions just post here .
13 iul. 2010
Muscle Car Burnout
In this Photoshop Tutorial i will show you how to make your car burnout a little bit :) To begin we need a picture with a car , and we need to open it with Adobe Photoshop. For this tutorial i choose this car: Now for the burnout to be burnout we need to make the weal look like it's spinning. With the Magnetic Lasso Tool (L) or the Pen Tool (P) select the back weal like in the image below :
 For the spinning effect we will use Filter--Blur--Radial Blur with a amount of 25 , spin , and good . The car should look now like this :
 Now we have to add the smoke for the burnout to look real . We will use this smoke brush pack . Download and install the brush pack and add some white brushes on a new layer (Shift+ctrl+N) like in the image below :
 Now will come the beautiful part. We will make the smoke to look like it's coming from the tire. For this we will make a rectangular selection in the bottom part of the smoke because we want to shape the smoke to fit with the tire.
 After the selection is made , press Ctrl+T then right click on the area and click Warp then shape it until you get something like this:
 Now make again a selection on the bottom of the smoke and from Filter-Distort-Twirl add a twirl of 150 .The hit again Ctrl+T , right click on the area and click Warp then shape the twirled smoke to fit with the weal.
 The burnout is ready:D I hope this tutorial will help you . If you have any questions just post here . And don't forget to Follow.


