7 apr. 2010

Glowing Web 2.0 Text


In this tutorial , Easy-Psd will teach you to create with Adobe Photoshop a beautiful image with a nice background , text effects and light paintings.

  • To start create a new canvas in adobe photoshop by pressing Ctrl+N , set the background white and choose a average resolution like 800x600 .
  • Now press D to have the foreground color black and the background color white . Go to Filter>> Render>>Fibers with a variance of 30 and strength 4. Now the image should look like this :
  • We have to stretch a little bit the fibers so go to Image>>Rotate Canvas>>90 CW and apply Filter>>Stylize>>Wind 3 times from the Right and 3 times from the Left . Rotate back the canvas ( Image>>Rotate Canvas>>90 CCW ) and now the image must look like this :
  • Let's add a little bit of color to this background . Create a new layer ( Shift + Ctrl + N ) and apply on this layer a Linear Gradient from #ffc21d to #f1ff19 and back to #ffc21d .


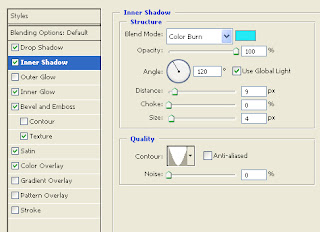
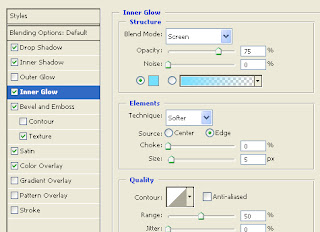
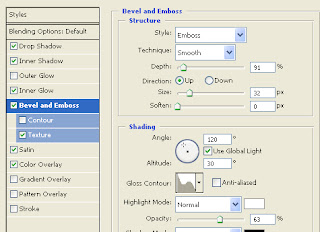
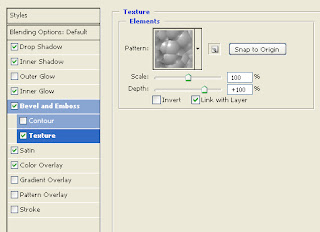
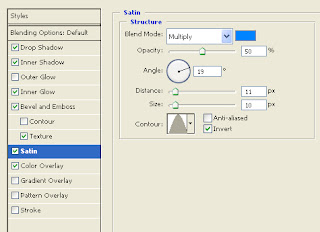
  • Set the gradient layer mode to Linear Burn , Merge Down the layer ( Ctrl+E ) and the background is done . Now we have to add the text . Press T make a selection on the bottom part of the image and write your text . Right click on the layer , Blending Options , click on Gradient Overlay and add a Linear Gradient from #b2b2b2 to #ffffff , from Stroke add a white ( #ffffff ) 3 pixel stroke and Drop Shadow like in the image below .
  • Now we will make the text to look like the Web 2.0 style . Go to Select>>Load Selection , create a new layer ( Shift+Ctrl+N) pick the Pen Tool or press P and make a selection like in the image below . First you draw the line , from the bottom part of the picture go to the point from where you started , Right click and press Make Selection .
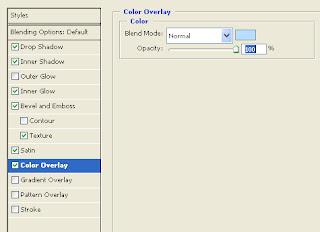
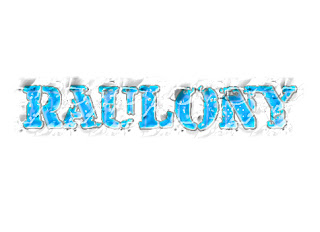
  • On the new layer fill the selected area in any color , right click on the layer and go to Blending Options , and from Gradient Overlay add a Linear Gradient from #ffffff to #e5e5e5 . Now your image will be something like this :
  • The text and the background are ready . Now will come the tricky part . We will add glowing lights from the back of the text . You must download and install the special brushes from here . Click on the background layer , add a new layer ( Shift+Ctrl+N ) , press B and select one of the new brushes you downloaded . Set you foreground color to white , and add some brushes like in the image below :
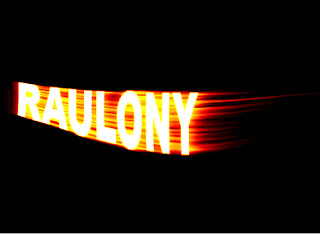
  • Create a new layer above the layer with the glowing brushes but below the text layers , select a soft round brush with a radios of 200 300 pixels . Select some light colors and brush on the glowing lights . Set the layer mode to Overlay and the image is ready . If you think that the background layer is not dark enough click the layer with the background , press Ctrl+L and give another value in the middle box ( the values under 1.0 make the image darker and the values above 1.0 make it lighter ) . Final result :


5 apr. 2010

Stencil


1)First you need a picture . Open the picture with the photoshop and if the picture is not black and white desaturate it (Shft + Ctrl + U).


2)Adjust the threshold. Image >> Adjustments >> Threshold. Move the slider until you get a good result and click OK. The image below is what I used but this will differ for each picture.


The resulting image maybe a little jagged (pixelated) but don't worry we will fix that.


3)Next a Gaussian Blur with a radius of around about 1. Filter >> Blur >> Gaussian Blur...


4)Now it will be blurry so we need to adjust the curves. Image >> Adjustments >> Curves.The line in the "Curves" dialogue box will appear as a diagonal. Click on this diagonal line twice and drag these two markers until your line forms an "S" shape.


Now the image should look like this :


5)Finally cut out the parts you dont want in the picture . I made a selection with the unwanted parts using Pen Tool and i made the selection black.
Final result:


I used this stencil to make a t-shirt but you can also use it to paint the image on something . Here is a picture with the t-shirt .


4 apr. 2010

Glass Text


1)Create a new white file and write the text with any font .


2)Right click on layer--Blending Options and use this settings :


At Inner Shadow put this colour 24e9f5

For Inner Glow apply 75e0ff

For Satin use this colour : 0084ff
b8deff for Color Overlay
Final result:

Speed Text


1)Create a new file with black background . Write the text with wite and put it on the left site .

2)Duplicate the layer with the text , select it and put it under the original text layer. Apply Filter--Stylize--Wind(From the left) . Repete this filter 3-4 times . Apply Filter--Blur--Motion blur with this settings :
3)Select the first layer and press CTRL+E . Now press CTRL+T , right click on the text and choose warp . Make the text look like this :


4)Go to Image--Mode--Grayscale , Image--Mode--Indexed colors , Image--Mode--Color Table and choose Black Body . Final result :


Neon


1)Create a new file with black background and white text .

2)Duplicate the layer , go to Filter--Blur--Gaussian Blur and use 2 , 2 . Right click on layer--Blending Options and use this settings
The image must look like this :

3)Move the layer with the original text above and select Blending Mode overlay

Hot Text


1)Create a new file with black background and write the text in white

2)Apply Filter--Blur--Gaussian Blur with Radius 2

3)Go to Image--Mode--Grayscale , Image--Mode--Indexed colors , Image--Mode--Color Table and select Black Body . Final result :

Gel Text


1)Create a new doccument and write the text you want .
2)Right click on layer--Blending Options and use this settings :

Final result :

Fire Text


1)Create a new file with black background and write the text in white :

2)Go to
Image--Rotate Canvas--Rotate 90 CW.

3)Apply Filter--Stylize--Wind(To the Left) , and use this filder 2 times .

4)Now go to Image--Rotate Canvas--Rotate 90 CCW
5)Filter--Blut--Gausian Blur 2 times

6)Filter--Distors--Ripple.Amound:100 Size:Medium.
7)Go to
Image--Mode--Grayscale , Image--Mode--Indexed colors , Image--Mode--Color Table and select Black Body. Final result: